For the last few months, I’ve been absolutely fascinated with the SerenityOS project and it’s awe-inspiring rate of progress. For every day that goes by, new features and bug-fixes get merged in, and development screencasts from the creator Andreas Kling are an almost daily occurence. The operating system itself follows a design philosophy that has all-but-disappeared from computing in the last 15 years or so – a philosophy that I, along with every other fan of this project, want so badly to reappear in the modern computing landscape. See below for a screenshot as of November 2019 —

It could be nostalgia, real productivity value, or both that drives my want for a return this kind of desktop computing metaphor. No animations, superfluous UI trinkets, padding or dark patterns. I’d describe it as a snapshot of the personal computing metaphor where the utility value for software developers was at it’s highest; right before a seemingly general pivot from what I’d call ‘focus-on-productivity’ computing to ‘focus-on-consumption’ computing. What we left behind in the early 2000s was, in my opinion, the perfection of the desktop metaphor for computing professionals.
In a spot of boredom last night, I attempted to get SerenityOS running in a virtual machine on my Surface Book 2. This proved harder than I’d had expected, so I’ll quickly outline the steps I took to get the development build working – in case anyone else can derive some value from my learnings.
What I tried
My first attempt was to follow the build instructions, to the letter, entirely within my Ubuntu MATE 18.04 VM – an operating system not unlike what Andreas himself uses for development. For whatever reason however, I kept facing issue after issue – from mismatched build dependency versions to my VM randomly deciding to corrupt whatever I download in it. After downloading Serenity’s sources externally, then transferring the tarball to the VM over a shared folder, I was met with a quite slow build process – a process which eventually failed on something that I couldn’t at all fix.
My plan B was to utilise a Ubuntu Server 18.04 VM I had spare on my home server, an Intel NUC running VMware ESXi. I gave this VM 4 CPU cores, and 4 GB of RAM. I followed the same build instructions again, this time with the build progressing much faster, until I was faced with an error in the compilation of the Serenity kernel. I’m not an OS developer, however I knew going in that usually to cross-compile an operating system, you must first compile a cross-compiler (this is what the Toolchain/BuildIt.sh script does in the Serenity repo), and that this cross-compiler is then what is used to compile the rest of the system. In my case however, some parts of the system were being compiled with my system compiler, which on Ubuntu 18.04, is GCC 7. GCC 7 does not contain support for the C++2a standard, and this was causing an issue when the code required support for it. I installed GCC 8 through apt install gcc-8 g++-8, and then ran update-alternatives as similar to this StackOverflow answer to set this version of GCC (gcc-8, g++-8) as the machine’s default C and C++ compilers.
Running Kernel/makeall.sh again successfully builds the system disk and kernel images. The build instructions now instructed me to Kernel/run.sh to run the system – however as I’m SSHed into a remote VM with no X server to view QEMU on, this wouldn’t be of much use to me. I copied the _disk_image, kernel and kernel.map files from the Kernel directory to the Ubuntu MATE 18.04 VM on my Surface Book, transplanting them into the Kernel directory of my failed Serenity build. Running ./run.sh now worked – the Serenity system immediately booted in QEMU, in my MATE 18.04 VM. As I was running QEMU inside of VirtualBox however, things were extremely slow. The smart thing to do now was to attempt to boot it on qemu Windows.
How I got it running on Windows
As I don’t have an X Server on my Windows installation to run a Linux version of QEMU in, I decided it would be more efficient to just run a Windows build of QEMU directly. I downloaded and installed Stefan Weil’s 64bit QEMU build and went on my way.
Taking my disk and kernel images from my build VM, I cloned the Serenity repo inside WSL and placed the images into the Kernel directory. The Serenity Kernel/run script is a bash script and thus must be ran by a bash interpreter. My first thought was to run this directly inside WSL, altering the Kernel/run script to use the qemu-system-i386 executable from my QEMU installation. Doing this did yield some progress, however, QEMU was still finding issues in attempting to establish a network interface for the VM. I modified the run script and removed the -netdev and -device e1000 lines from the default QEMU invocation at the bottom of the file. After making these modifications, Serenity booted successfully.
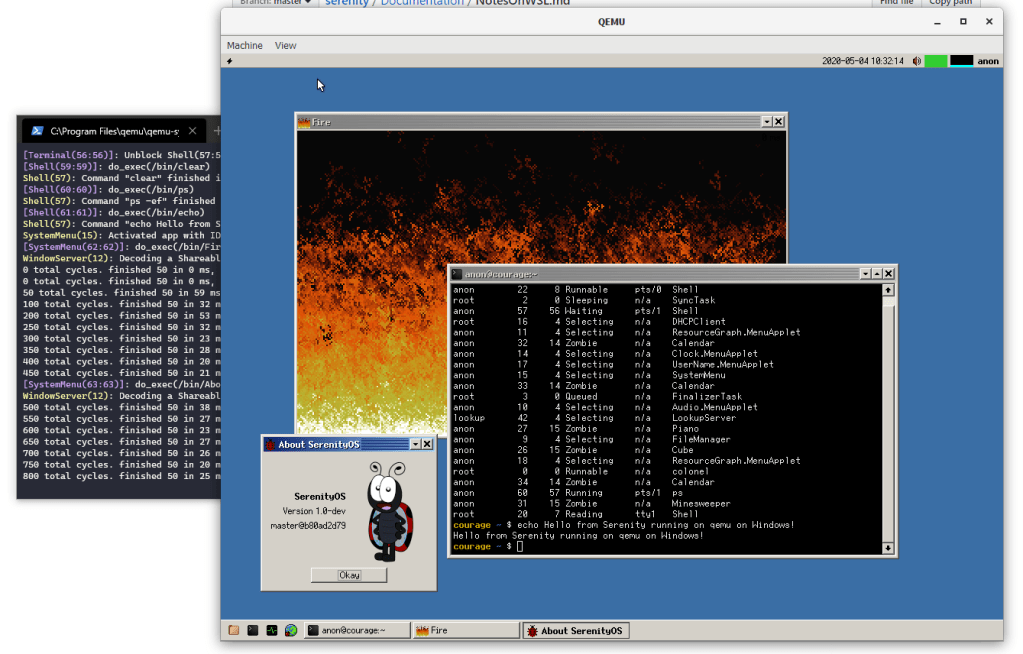
Really, there is no requirement for WSL in any of this – I used it to quickly discover what exactly the Kernel/run script was doing and to discover what to change for a successful boot. The commandline below should be able to start QEMU with the Serenity images from Windows cmd;
"C:\Program Files\qemu\qemu-system-i386.exe" -s -m 256M -cpu max -d cpu_reset,guest_errors -smp 2 -device VGA,vgamem_mb=64 -hda _disk_image -device ich9-ahci -debugcon stdio -soundhw pcspk -soundhw sb16 -kernel kernel -append helloThat’s all for this blogpost. I know I had said I’d blog once-per-week but that’s definitely something much easier said than done :/. Recently I’ve acquired and began using a Nokia 2720 Flip (2019) as my main mobile phone; I do eventually plan to write on about why exactly I decided to do this, and what it’s like to develop for the KaiOS platform. Follow me on Twitter or subscribe to my RSS to be notified when I post 🙂
Until next time.

Would you please consider providing a download link for prebuilt serenityos on qemu?
LikeLike
Hey,
the command above does not work anymore, since they made some changes to the Kernel.
I made it work with this command:
“C:\Program Files\qemu\qemu-system-i386.exe” -s -m 4096M -cpu max -d cpu_reset,guest_errors -smp 2 -device VGA,vgamem_mb=1024 -hda _disk_image -device ich9-ahci -debugcon stdio -soundhw pcspk -soundhw sb16 -kernel Prekernel -initrd Kernel2 -append hello
I changed the last parts pertaining to the kernel. Also, the VM ran out of memory during boot, so I threw 4GB at it. Don’t know if that much is necessary, but it works.
Cheers
LikeLike
Oh, and you need to move the Kernel (rename to Kernel2 to avoid conflict) and Prekernel files to the Build directory
LikeLike